This page details the simplest and most straightforward means of connecting a Dragon to a PC for use with PCShare. The connection utilises the printer ports (parallel) of both machines to perform the link. It doesn't cover how to use or setup PCShare not does it explain the principals behind how the link works (both of these topic are covered elsewhere).
Note: Your PC's parallel port must be capable of 'reverse byte mode'. Most modern PC's are (since at least the 486 days). This is not EPP/EPC but if you've got this then you've definitely got the reverse mode.
The procedure involves the following steps:
Next, cut some wire links and on the site of the buffer chip, connect the following pins to each other:
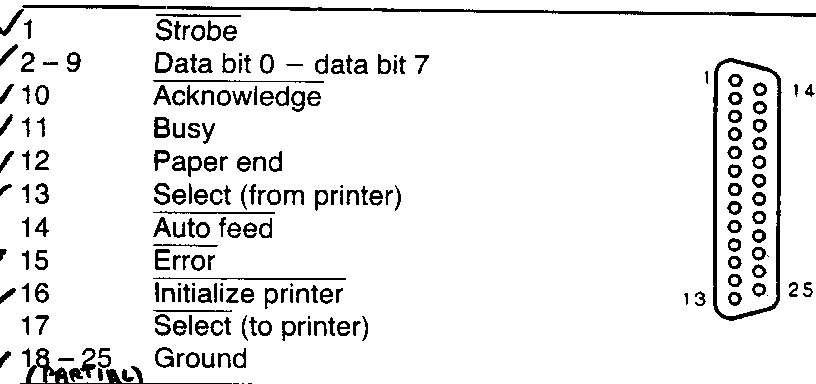
Connect pins 2-9 to pins 18-11
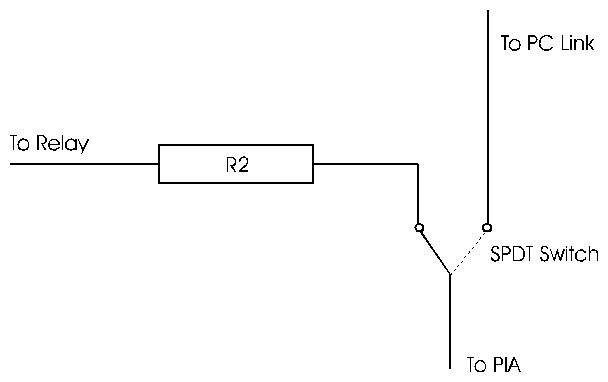
Dragon 64: Locate resistor R2.
Dragon 32: Locate resistor R32
It should be adjacent to the cassette relay (a rectangular cube device). Using a small pair of wire snips, or craft knife cut one end of the resistor away from the board. You now have a choice. If you can determine the side of the resistor which connects to the PIA using a multimeter then solder a length of thin wire to the end of the resistor (this is the safest method). If you are not sure you will have to solder the wire directly to pin 39 of the PIA itself, but _be_ careful about not damaging the chip during soldering as they can be sensitive. The PIA in question will be a 40 pin chip marked XX6821, on the Dragon 32 it is marked IC35, on the Dragon 64 it will be IC8.
If you do have a multimeter you can determine which end of the resistor to solder to as follows: Set the meter to a resistance range capable of measuring 4.7kh. Connect 1 probe to one side of the resistor. Connect the other end to pin 39 of IC35 (D32) or IC8 (D64). This is a 40 pin chip (a PIA marked xx6821) and should be easy to locate on the board. If the multimeter reads 4.7k you need to use the other side of the resistor for the following modification. If it reads 0 ohms you have located the correct side of the resistor.
Once you have connected the flying lead to either PIA or resistor leave the other end loose for the time being.
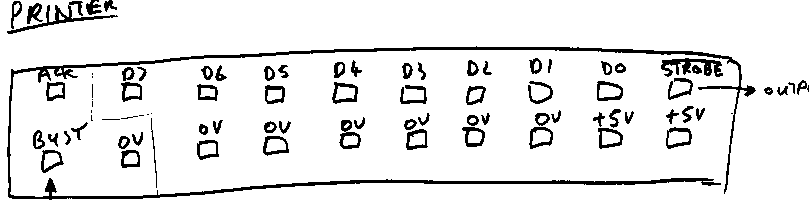
The Dragon's printer port is show below (viewed in a similar manner).
Crimp one end of the ribbon cable onto the IDC connector. These are normally tough connectors to crimp, you cannot use a pair of pliers. You can either buy a dedicated tool to crimp them or else a good vice normally does the job (I used to use a cheap mini vice which I got at one of the £1 shops for 99p).
Now, you have to solder up the cable to the PC end as follows:
  Dragon     PC
  ------     --
   D0->D7    Data bit 0 - Data bit 7
   0V        Ground (not all of these need connecting, do at least 2)
   ACK       Strobe
There remains one connection to achieve, the flying lead you had earlier needs to connect to the PC's Acknowledge line.
How you achieve this is somewhat down to you, a possibility if you don't mind the complete loss of the Dragon's printer port is to use one of the unused pins on the port. Once of the 5V lines would be a prime example but if you look at the connector inside the Dragon they are a bit difficult to get to. The other alternative is the strobe line - you can snip the copper link coming out the back of the connector and solder your cable to this.
Alternatively, just take the flying lead along the IDC cable, using tie backs to keep the two together.
The link is now complete. Before you plug in and switch on, check out the lead with a multimeter if you have one. Specifically, make sure the +5V lines on the Dragon's parallel port aren't connected to anything - they are NOT logic power and come direct from the main PSU and could probably fry something if connected erroneously.
When you first switch everything on, asuming the link is connected you will find the keyboard on the Dragon has been disabled. This is because the printer port is shared with the keyboard and is normally configured for output. However, the PC's printer port is also configured for output by default and is therefore preventing the keyboard from functioning. If you now start PCShare, it will initially put the port into input mode, releasing the keyboard so you can boot OS9.
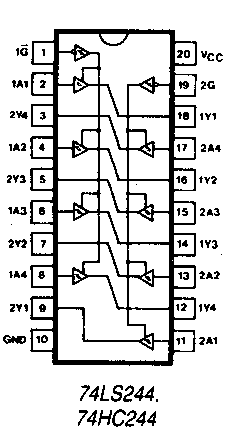
If you are serious about keeping the printer port, you could consider adding an extra IDC (or whatever socket) for your PC link. This involves a fair bit of work as you would have to cut an IDC socket in the side of the case and mount the connector to it. To connect up the socket do not remove the 74LS244 buffer, but rather solder wire links from the buffer chip to the connector as follows:
 D0 -> Pin 2
 D1 -> Pin 4
 D2 -> Pin 6
 D3 -> Pin 8
 D4 -> Pin 19
 D5 -> Pin 17
 D6 -> Pin 15
 D7 -> Pin 13
Next, connect the ACK line from the printer IDC socket itself to your new socket. You will also need some ground (0V) connections, and you can then connect the flying lead from the cassette relay mod to whatever spare pin on the connector you have available.